

In the last update, I shared the cooling system and a short video showing the car running. In order to prepare for the first street tuning session, I needed to get the car roadworthy. This meant that I needed to find a way to mount the battery, finish the intake/exhaust and figure out the gauges.
LS Swap FC RX-7 – Battery Tray
Something that is always a challenge when doing a swap is finding a spot for the battery. Many LSX-swapped FC RX-7 owners end up mounting the battery inside of the car. While this was an option, I needed to make sure that the car would easily pass tech inspection and I didn’t have lot of money leftover to buy an expensive battery. I wanted to use a common off-the-shelf battery that could still be replaced at any store that sold batteries. I had heard great things about Odyssey batteries, but finding a replacement locally if they go bad can be difficult.
Before I bought a battery, I was using the battery from my Honda S2000 to start the engine. It was easy to remove from the car and the 500 CCA was enough to start the big (by comparison) L33 engine. S2000’s use a smaller than normal battery but it’s still a standard size and can be bought at just about any place that sells batteries.
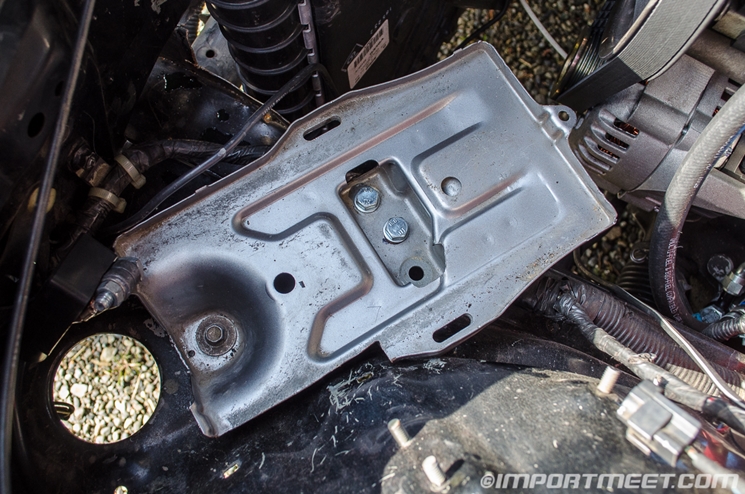 After removing the battery 2-3 times, I noticed that the S2000 battery tray would fit nicely in the front of the FC engine bay. What I liked about the S2000 battery tray is that it was a stamped piece of sheet metal with provisions for a battery tie-down. It only required the removal of 3 bolts to do the test fit and after placing it in the FC engine bay, it was obvious that it would fit perfectly with some minor trimming.
I ended up buying a used battery tray with the stock tie down rods on eBay for about $30 and trimmed the corner to fit around the front wheel well. I used steel spacers which allowed the bottom of the battery tray to sit nicely on the frame rail. I then drilled and tapped two holes in the frame rail and used an existing hole near the front corner of the car to lock it in place.
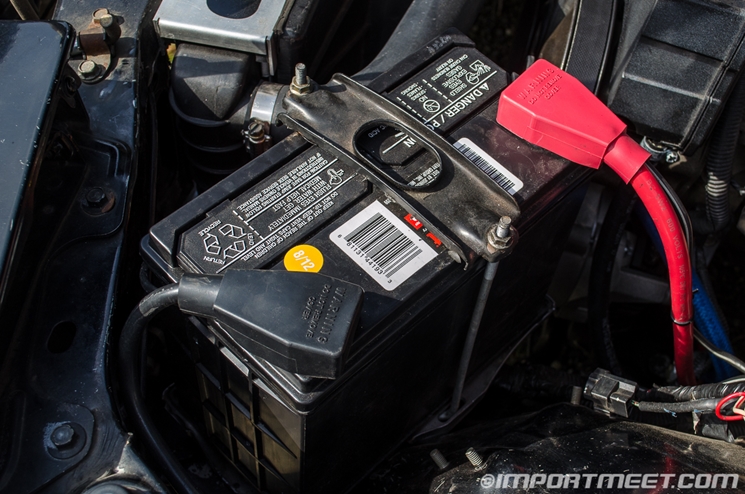 Once the tray was mounted I found a 51R-4 battery locally for around $80 after tax. The 51R-4 has the battery poles flipped which meant that the positive terminal was further from that hood than it would have been in the normal orientation. Lastly, I installed plastic boots to cover both of the terminals. The entire solution was a little over $100 and it beat trying to use an expensive Odyssey battery and bracket.
Total weight of the 51R-4 battery: 27.4 lbs
Note: Even though the battery is only 500 CCA, it had no problem starting the engine during the winter at near-freezing temperatures.
LS Swap FC RX-7 – Intake Setup and Throttle Cable
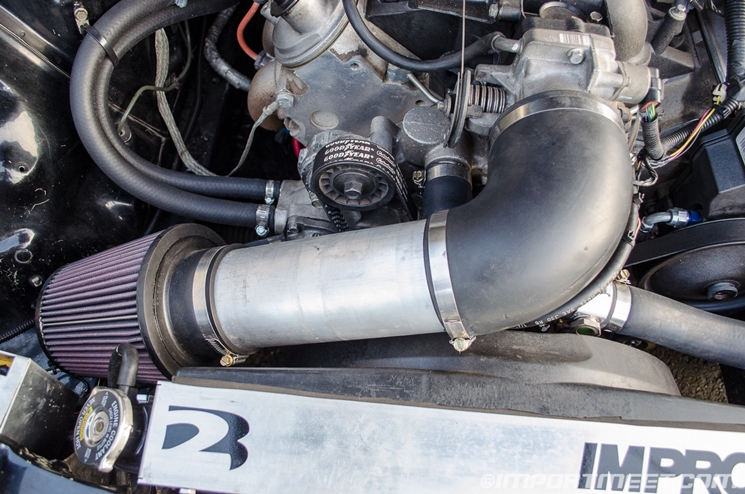
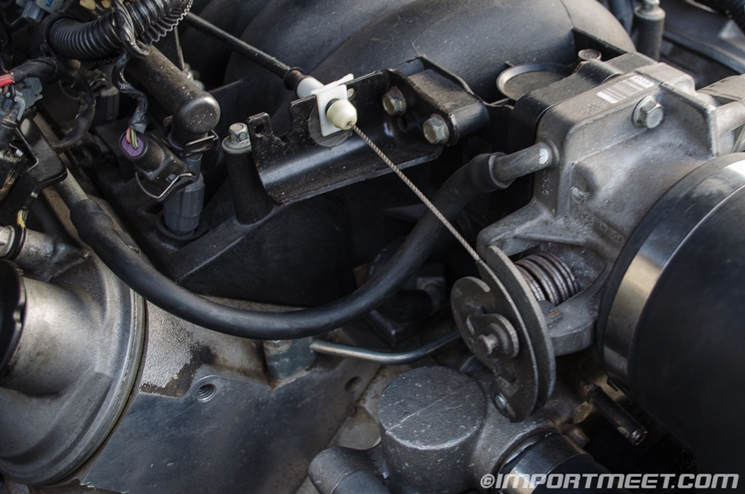
FC RX-7’s have such a large engine bay that it makes finding a spot for the intake easy. Matt from Secondbolt Racing had some spare 3.5” aluminum tubing and silicone elbows to build an intake from. I used a 90° elbow with a ~14” long aluminum tube and positioned the intake to the passenger side. I bought a K&N RE-0950 cone filter from Summit Racing and installed it onto the end of aluminum tube. Since I’m planning on going speed density, I did not install the stock MAF but I did put the IAT sensor in the upper elbow.
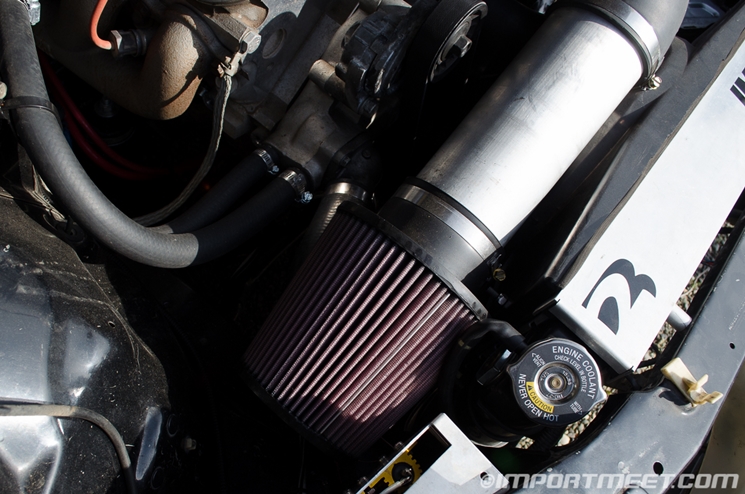
 The stock LS1 intake has a large hole for the EGR system that needs to be plugged. After a quick measurement, I went to the hardware store and found a rubber stopper that fit perfectly. If you want to do something similar, make sure the stopper is tapered and only slightly larger than the top of the hole. I found a stopper that measured 1.375” at the top at a local hardware store. After it was pressed in, it sealed completely and hasn’t moved after 500 miles of driving.
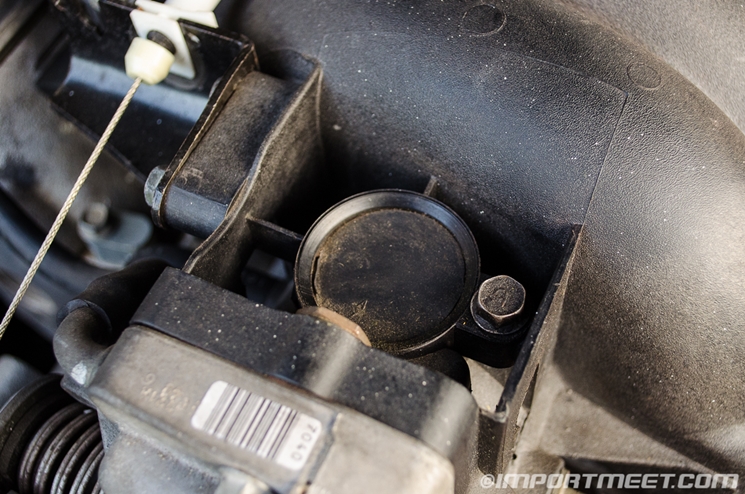 For the throttle cable, I used a stock F-body cable from a 98-99 Camaro (part number for reference: 12565559). The length of this cable is ideal for FC RX-7’s and after enlarging the hole on the firewall slightly, it fit perfectly.
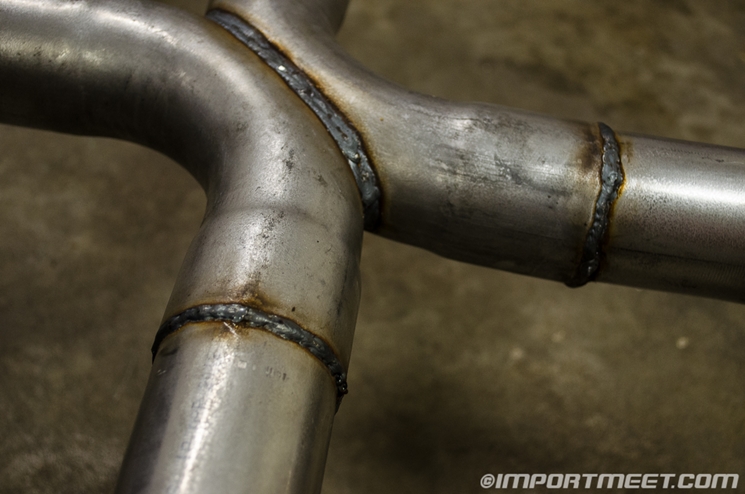
 LS Swap FC RX-7 Custom Magnaflow Dual Exhaust
Matt from Secondbolt Racing was parting out a swapped FD RX-7 and had two extra Mangaflow mufflers leftover. He decided to fashion me a custom exhaust using piping purchased from Summit Racing. Matt did a great job and it was nice to use the mufflers he had to keep the cost down.

 LS Swap FC RX-7 Speedometer and Aftermarket Gauges
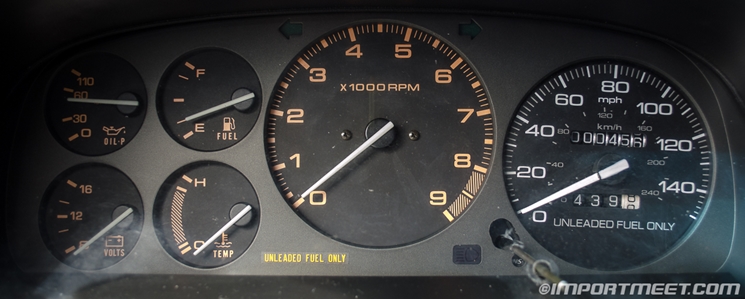
All FC RX-7’s came with cable driven speedometers. In order to get the stock speedometer to work with the output from the LS1 PCM, many people have been forced to use expensive converter boxes or an aftermarket speedometer.
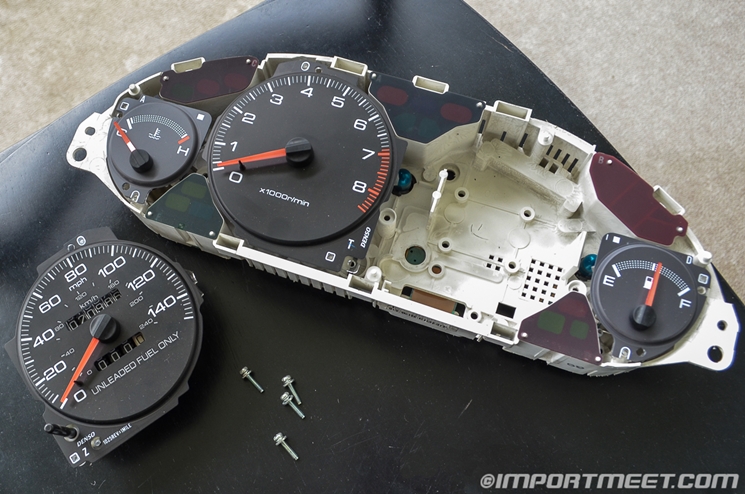 Recently, someone discovered that Acura Integras (94-01) use an electric speedometer that is approximately the same size as the stock FC one. HP Tuners (the tuning software that I plan on using) allows the tuner to change the final drive ratio which ends up changing the speedometer output. This makes this a cheap and easy way to get a functioning speedometer while still using the stock FC cluster.
I was able to source an Integra cluster from a friend (thanks Blake!) and separated the speedometer from the rest of the cluster. I then removed the speedometer from the FC gauge cluster. The walkthrough I followed wasn’t exaggerating when they said that a large portion of the plastic structure had to be removed. I used a Dremel to make room and scissors to cut the faceplate of the Integra gauge. It’s really difficult to show exactly how much material had to be removed but I just kept removing material until it sat flush. Wires were added to the Integra speedometer and then soldered to the back circuit board.
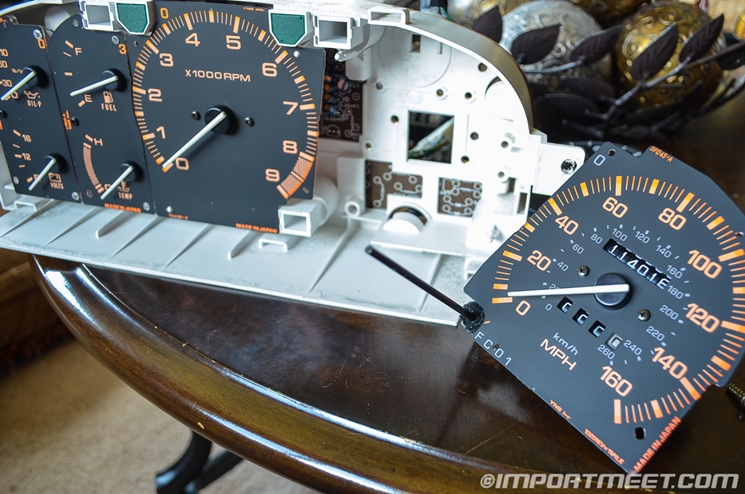 While the Integra speedometer was out, I rolled the odometer back to zero. I wanted this to be treated as a reference for how many miles were on the car since being swapped. I noted that original cluster mileage for insurance purposes (only 114,018 miles on the chassis!).
 Instead of reusing the FC cover (it was too thick) I just kept the Integra one. It isn’t orange like the rest of the gauges but this is going to be my race car so I didn’t think it was a huge deal.
Click here for the full tutorial on how to do the speedometer swap on Norotors
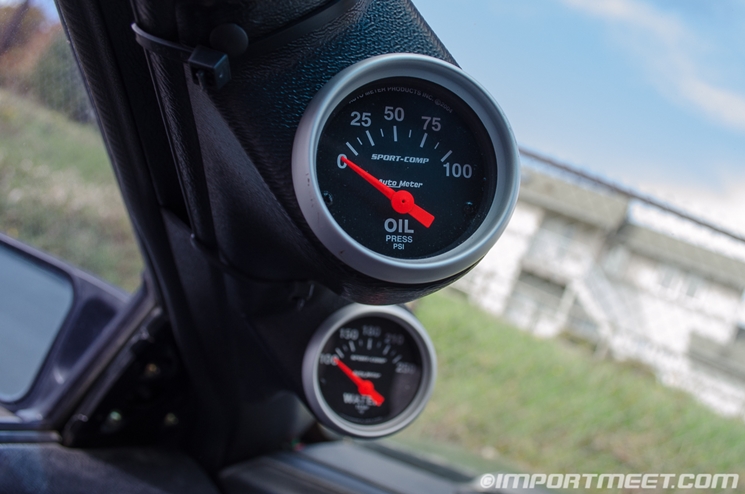
In addition to the speedometer, I also wanted to have oil pressure and water temperature gauges. Having used Autometer in past projects, I opted to use them in again on this project.
Oil pressure gauge: ATM-3327 from Summit Racing
Water temperature gauge: ATM-3337 from Summit Racing
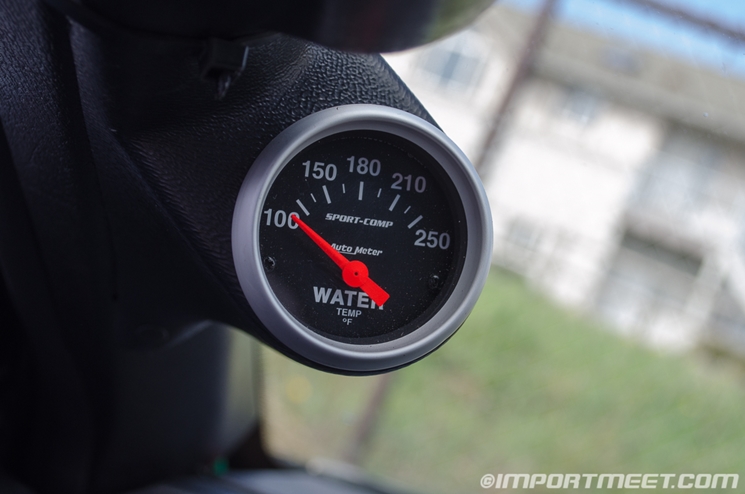 I used the Autometer oil pressure and water temperature senders and installed them in the stock locations.
I bought a generic FC 2 gauge A-pillar pod and as you can see it’s held on with zip tie I plan on developing a more permanent solution soon but this is working for the time being.
 In the next update, I’ll discuss my first street tuning sessions and dyno session. Thanks for reading!
Previous posts about Project V8 RX-7:
Update 16 – Cooling System & First Spin of the Drivetrain
Update 15 – Clutch Master Cylinder Install
Update 14 – T56 Transmission and C4 Driveshaft Install
Update 13 – First Start
Update 12 – Stage 1 Fuel System
Update 11 – Rear Subframe Modification and Bushing Install
Update 10 – S4 Turbo II Parts Car
Update 9 – L33 Modifications and Preliminary Install
Update 8 – Ronin Speedworks LSX Mount Kit
Update 7 – Improved Racing Oil Pan Baffle Install
Update 6 – Parts Engine Teardown
Update 5 – 5.3L Engine Purchase
Update 4 – The New Shop
Update 3 – Drivetrain Choices
Update 2 – Interior and Wiring
Update 1 – Engine Bay Preparation
Introduction to the Project
2 Comments
Was this project abandoned? I do not see any updates after 17 on the site. Great job so far.
Nope. The project was put on hold for awhile due to a busy year last year. The car is still running great and I have put a little over 1,000 miles on it since it was swapped.
I’ll be starting up video project updates very soon as well as short articles about the projects I have planned. There are some cool things in the works!